Jul
29
Tutorial: Half Square Triangle using a Tube
Filed Under Quilting, Sewing | 12 Comments
A while back I stumbled upon something called “tube quilting”. I think it’s generally meant to be a technique to get blocks that look something like string blocks — with a lot less sewing — but the first thing that popped into my head was a potentially quick way to make half square triangles (HSTs).
Always wanting to try something new, I used this technique to make my first mug rug. And for posterity, or publicity, or maybe just cuz I love my camera, I took pictures of the process.
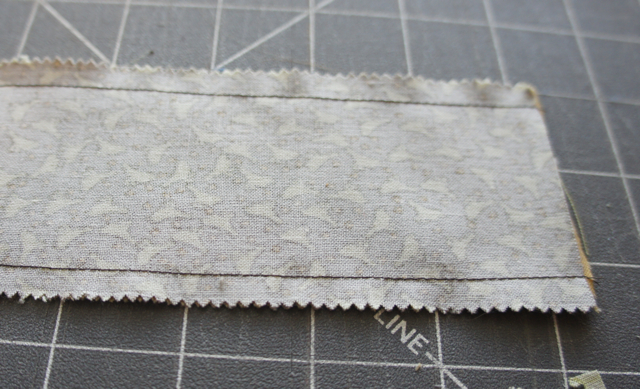
So the general idea is to create a “tube” of fabric from two strips sewn down each side as shown below. I probably should have taken a shot of both sides, but youse guys are smart and I’m sure can figure it out on your own.
The other tutorials I’ve seen want you to buy a special cutting ruler called the “strip tube” ruler. As if every quilter has unlimited funds lying around to drop another $20 on a ruler. What is with that anyway? A piece of plexiglass with some markings on it and the quilting companies think they can charge us an arm and a leg… Yeah, I always wait until they’re on sale at JoAnn… or I just use a weekly 40% off coupon for JoAnn. But anyway, I really only have two. The one shown and another one for something that I can’t remember. Once again, I digress.
So rather than buy the expensive “special” strip-tube ruler, I figured out what size I wanted my finished triangles, and used the pythagorean theorem (yes, math!) to figure out how wide to make my strips. Ok, not really… I just used two strips from a jelly roll and sewed them together…. but you could use the pythagorean theorem if you were so inclined….
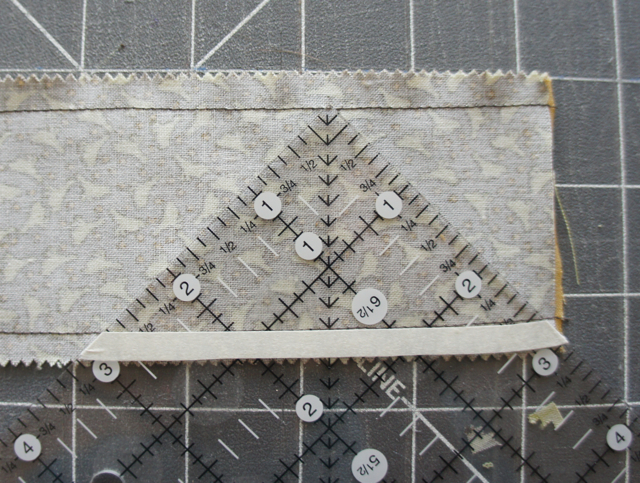
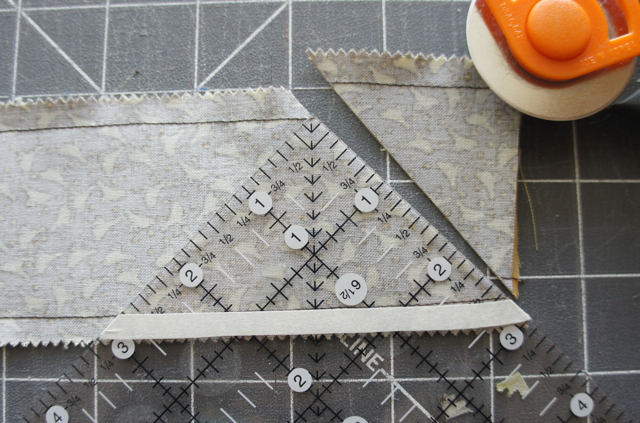
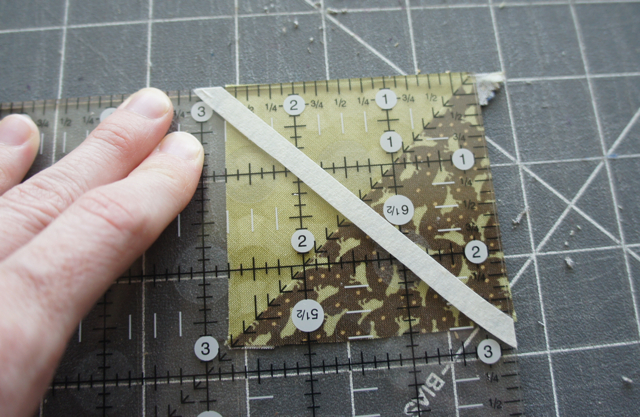
After I sewed the strips together, I just plopped my square ruler down with the point on one seam, then I added a strip of tape to mark the straight edge where the other seam lies. This isn’t strictly necessary, but it made lining the ruler up super fast.
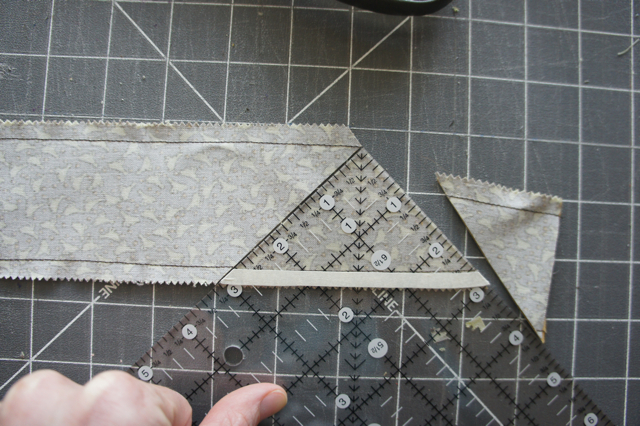
Now, take a deep breath and make the first cut. That piece you cut off is scrap.
Cut along the other edge of the ruler, and you have your first HST. (This second cut is just barely visible in the following picture.)
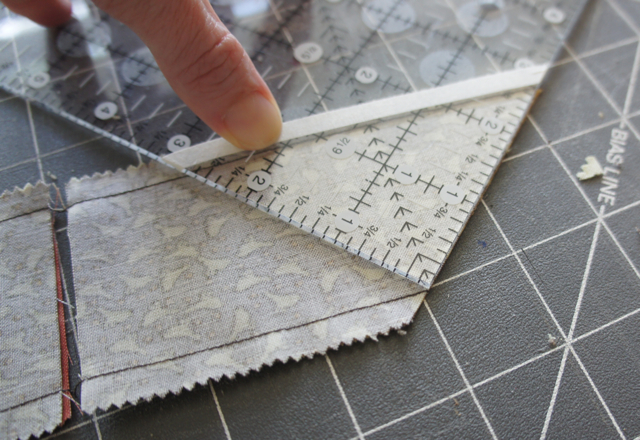
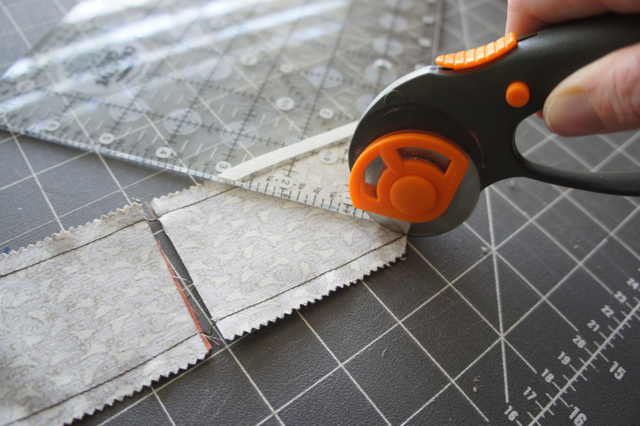
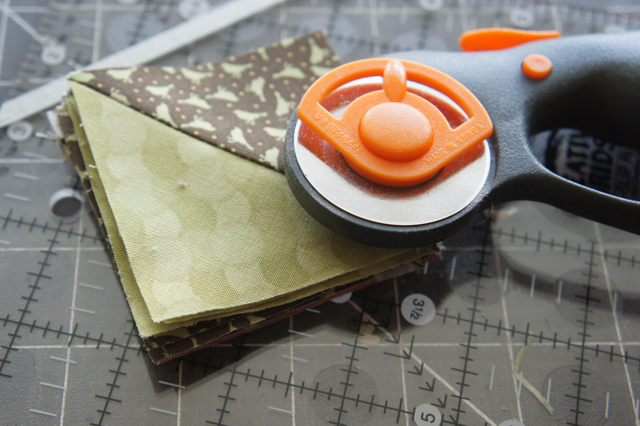
Flip the ruler upside down and match the tape marker up with the other seam, and one edge with the already cut edge and make another cut. Now you have another HST!
Keep going until you get to the end of your tube, or have as many HSTs as you need.
Now the pieces need to be squared up. Because they are essentially cut on the bias, these blocks have a tendency to get a little wonky. My ruler has an awesome bias line, so I matched that up to the diagonal on the HST block and straightened each edge while at the same time removing the “dog ears.”
Press the blocks and you are done!
Now, the real story. I’m not sure I would use this technique for HSTs again. I’m rather impatient, and flipping the ruler back and forth 80-jillion times got old fast. Not to mention I couldn’t really find a comfortable position to cut without also flipping the fabric back and forth. I also wasn’t wild about having my triangles cut on the bias. It makes sewing them together a bit more of a headache. There was also a good bit of waste, since both end pieces are an entire 1/2 block in themselves. I suppose you could minimize that waste by placing your blocks en pointe.
OTOH, if I was going to make a LOT of string type blocks, I could see how tube quilting could be useful.
All in all, it was a neat experiment. Maybe others will have better luck. If you try this out, let me know, I’d be interested in seeing your results!
Jul
28
Crash, bang, birthday!
Filed Under Ranting, Remembering | 2 Comments
I told you how awesome my fourth of July weekend was, what with the fabric and pattern finds, but what I haven’t mentioned yet was the conclusion to that weekend. Technically, I suppose my luck ran out after the weekend and just before the first of the work week.
Tuesday morning, July 5th. The day before my sweet boy’s first birthday. I buckled him into his car seat to take him to the sitter (my mom) so I can go to work. But damn. I forgot the container of creamer to take to work, so I ran back in to get it. Back outside I remember that we’d been working on my dad’s house over the weekend and the shop vac with nasty gunk in it was in the back end of my car. So I open the tailgate and put the shop vac into the garage. Come back around and pick up the creamer and pull the tailgate shut… and that’s when I was all of a sudden on the ground wondering why my teeth hurt so bad.
Yeah. Genius. Ow ow ow. Holy shit, my head hurts…. I crawled into the car from the passenger side and fished around in my purse for my phone while holding my head with the other hand and dialed Chris and told him to come home. NOW. I knew he would think I was over reacting, but I was really proud of myself for not crying and having the presence of mind to actually call him before collapsing in the driveway. That’s when the baby started screaming. That’s when I noticed my head was gushing blood.
Somehow I managed to get a towel out of the kitchen and put it on my head. And all I could think of was the pain. And that I was very lucky that the baby was already buckled into his seat. He was pissed off about it, but I knew he was safe. I was also really glad that I didn’t get any blood in my Coach purse. Yeah, I have my priorities straight. Really.
I think Chris was pretty shocked when he pulled up to the house a few minutes later to see me bleeding and rocking in the driveway saying “oh shit oh shit oh shit” over and over again.
Next thing I knew, we were in the ER and they were asking me if I blacked out. I didn’t think so (though now I do think I did as this disjointed recollection clearly — ha ha — shows). Then we were sitting in the waiting area for what seemed like forever while some dude kept telling me that I had blood running down my arm. No kidding, Sherlock, really?
What happened to blood being the ER’s equivalent to a fast pass at Disney? Cue really bad elevator music.
Fast forward a few minutes. Now I’m sitting on a table in a freezing exam room with a wad of gauze stuck to my head with some sort of numbing gunk on it, blood drying on my pants and arms. Meanwhile, the doctors and nurses are running around freaking out because the handout on the tetanus shot says that people who’ve had Guillain-Barre syndrome, might be contraindicated. Whatever.
Lucky me. While they were trying to locate an immunologist, I needed to go…. badly. So I found a restroom. But on the way out my gloppy gauze fell off my head and landed — yep, you guessed it — gooey side down on the nasty hospital bathroom floor. Joy.
Twenty minutes later the doctor comes back in and tells me he thinks that I could have the tetanus shot because my reaction was to a flu shot and the tetanus shot doesn’t have the same ingredients that caused my reaction. Eh? I didn’t care anymore, I was going to get the shot anyway. I’m pretty sure my neurologist would have told me to get it.
Now the doctor wants to go ahead and do the staples in my head — because staples are better and don’t require shaving hair — but the nurse has brought the wrong staple gun in. That thing was huge. I swear it was big enough to staple an elephant who just had a c-section together. After the doctor finds the smaller stapler, I finally get to point out that the numbing gunk has been off my head for a while, and that maybe we should put more on there. The doctor declines and says it will be ok, it hasn’t been long enough to wear off. Um, ok.
Five staples and much pain later (yeah the numbing effect didn’t wear off at all), we finally got out of there. Chris took pictures, but I’ll spare you the gore. They forgot to mention that I might have a concussion. Which I didn’t really figure out on my own until a couple of days later when I ran a red light in my foggy stupor and realized that maybe I shouldn’t be driving… especially with the kids in the car. The fourth day, I woke up and everything was clear again, and that’s when I realized I must have been concussed. I’m telling you, top rate speedy care at that ER, baby. All for the bargain price of $1500 bucks or something.
So that’s how my awesome weekend ended. I suppose it could have been worse.
Jul
27
Wordless Wednesday — Rainbow edition
Filed Under Geeking, Quilting, Sewing | Leave a Comment
Jul
26
Simplicity 3835 – Take 1
Filed Under Sewing | 5 Comments
Previously I mentioned snagging several copies of Simplicity 3835. But despite my elation at finding a discontinued pattern, I was rather apprehensive about actually cutting it and trying to make something for myself. You see, in the past, every time I’ve ever tried to make an article of clothing for myself it came out way. too. BIG. No matter how much I measured before starting.
I knew I would make a muslin before I started cutting good fabric, but I didn’t want to be discouraged that the muslin would be completely off in size as well. So….. I decided to do some research. And from what I’ve read, Simplicity patterns tend to run big, so going down a size seems to work well for most people.
I ended up cutting out a 12, and this is the result. The pattern itself is super simple (except for the casing around the neck, because, really, trying to fold and iron curves like that is a major pain in the ass), it doesn’t use yards and yards of fabric, and comes together really quickly. I also don’t know if it’s me being more experienced, or me having the new machine, but this time all the hems came out straight with no wrinkling or gapping, and all the seams matched up perfectly. I’m pretty sure it’s the new machine… It actually sews in straight lines without me having to wrestle the fabric.
Overall, I really like the shirt. Though, it sometimes feels as if I have it on backward because I think the neck in back dips a little lower than in front. It’s also hard to get off. I can totally see where a zipper in back or a button or something would be super helpful. Or even just making the whole thing in a stretchier fabric. I’ve considered trying making it with fabric cut on the bias (lots of waste), or out of an old button down shirt so that the front unbuttons. What do you think?
Next up is going to be either the dress or mini-dress (tunic) from the same pattern using a gorgeous echino fabric in birdsong blue. Thankfully those both have zips up the back, so will be easier to wriggle into and out of.
Jul
13
Wordless Wednesday
Filed Under Uncategorized | 1 Comment


