


Dec
6
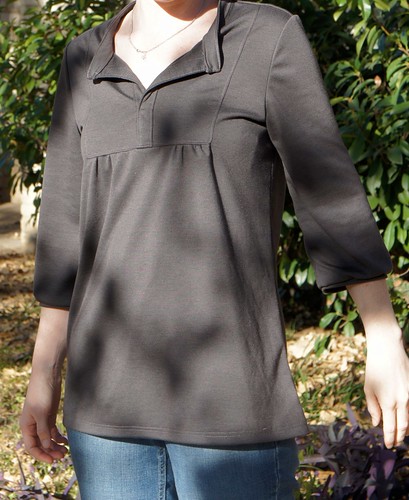
Best Tova Top Yet — In Knit!
Filed Under Sewing, Wearing | 3 Comments
I’ve been spending a lot of time working on clothing lately. A couple of tops for me (a Wiksten Tova and a Renfrew Tee), pajamas for the boy, and two new pajama pants for the girl. I’ve also got a leotard and bathrobe for Alexis on the blocks, and lots of fabric for more shirts for myself. If only I still had the motivation to get through that stack!
But today I’m going to tell you about my favorite piece so far. I’ve made a couple of Tova tops before out of quilting cotton. One of them I really like (and actually wear) but both are bit tight in the shoulders and underarms. The one I like less is really really tight despite my letting it out by nearly 3/8 inch all around. But I think if I went up a size, the rest of the shirt would just drown me. So even though I real like the pattern, I put it away for a while. Then I saw this top on pinterest. (You can see some of my other fashion — if you can call it that! — inspiration here.)
That version is actually the dress from the pattern, but I just loved the clean comfortable lines of it. It goes wonderfully with jeans. Perfect for work. So I went in search of a pretty gray wool and was determined to figure out how to broaden the back/shoulders of the pattern. Instead, I came home with a gray knit. The pattern is NOT made for knit fabrics. Which I knew, and I blatantly ignored my brain when it told me that I was nuts.
Of course that meant that I had lots of trouble sewing this shirt up. First of all, this is the first knit I’ve used that flat out wouldn’t work with a ball point needle. Skipped stitches galore! After some research (and rethreading and cursing and searching for a new machine and more rethreading and cursing), I found what I needed. On Black friday (of all days!) I headed to the local Hancock to buy ONE package of micro point needles. I had to wait in line for over 45 minutes for that little package of needles that cost me all of $2… but I was determined!
Once home, the difference was amazing. The clunk clunk clunking the machine had made before was minimized. (The serger still sounded like a train wreck, but at least it wasn’t skipping, too.) So what was going on that this magic thin needle helped? Turns out sometimes knits like this one don’t allow the needle to punch all the way through, which means the bobbin thread isn’t caught and thus skipped stitches. Have you ever had trouble pinning a certain fabric? Yeah, that’s the same issue. (Solved that one by getting these awesome pins from clover recommended by Sunni at A Fashionable Stitch.) BTW, I also read that you can solve this problem by putting a piece of waxed paper or tear out interfacing underneath the seam you are sewing to support the fabric so that it won’t stretch, but these were some long seams and I didn’t want to deal with tearing and moving paper all the way down.
I’d originally cut the pattern as the dress as my inspiration photo showed, but it was SO long, so I ended up cutting it off at the original hemline for the “top” version.
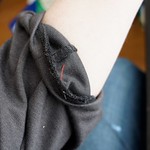
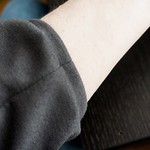
I also made a few changes to the pattern on the fly. First of all, I basted everything by hand before sewing it at the machine. (You can see my lovely red basting stitches in the sleeve photo above.) Also, you can imagine, top stitching through multiple layers of a thick (already persnickety) knit is no picnic, so after sewing the placket and collar, I decided to install the sleeve cuffs differently. I only folded the cuff, matched it to the edge of the sleeve and serged around it. I skipped all the quilt-binding style sewing and top stitching and I couldn’t be more pleased with the outcome.
On the hem, I simply serged around the bottom, and then planned on using a twin needle to sew it down. But, alas, the micro point twin needle did NOT alleviate the skipped stitches problem, and in the end (after several false starts and unpicking), I just sewed two lines of regular straight stitching. They aren’t perfect, but close enough. Lastly, the placket is much more floppy than it is when made from a woven, so I ended up needing to tack it closed about 2 inches up from the bottom.
This shirt is SO comfortable and isn’t tight through the shoulders at all. It’s my favorite shirt at the moment and I’ve been searching for another great knit so I can have another one!
Nov
11
Tardis Quilt
Filed Under Geeking, Quilting, Sewing | 10 Comments
Despite the tag line from this blog (I’m not a geek, I just play one in real life) and a previous post to the contrary, I am actually a geek. Well, in some ways anyway. Apparently even friends from middle and high school know this all too well…
A week before Sewing Summit an old friend contacted me and wanted me to make a Tardis quilt for her to give as a gift. The catch? She wanted it before Halloween (the recipient’s birthday — no it wasn’t me — obviously, hehe.) I knew I was going to be gone for 4 days for Sewing Summit, and that even if I took it with me I wouldn’t get anything done on it in SLC, so I basically had 2 weekends to knock a whole quilt out.
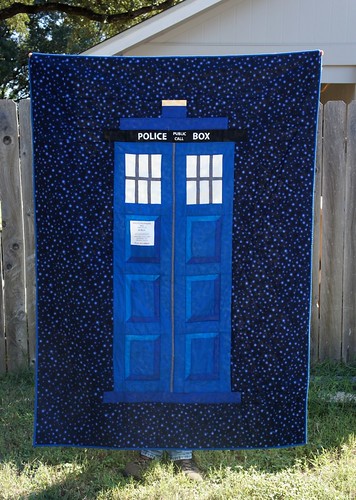
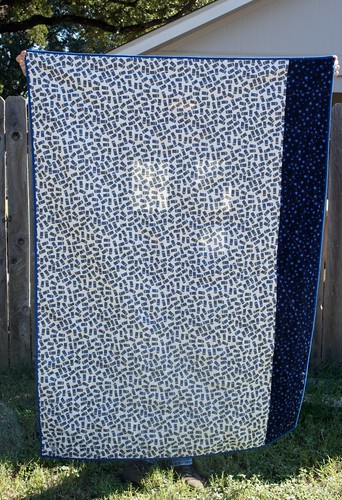
I sketched it up in my notebook pretty quickly and estimated the fabric. Then we started hunting for the perfect background and backing fabrics. (The rest of the quilt is in Kona solids.) The backing was pretty easy, there is this teeny tossed Tardis fabric on Spoonflower. (I’m really starting to think there are an awful lot of closet geek sewers and quilters.) So my friend ordered that and had it sent to me.
The background was a different story. We searched and searched for something “starry”. Finally I went into my LQS, and found this print by Robert Kauffman. It’s “Mixmasters Luminescence.” (On a side note, I can’t believe I spelled luminescence right on the first try!) I took a photo with my phone and texted it to her to get her approval. Don’t you just love technology? How in the heck did people survive before they could take pictures of fabric with their phones?!
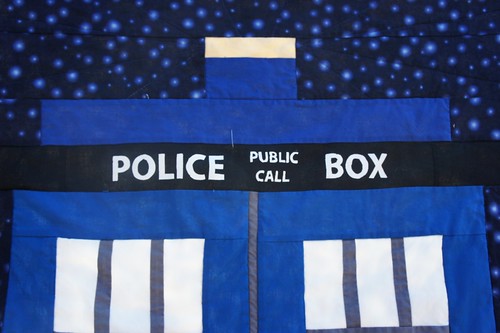
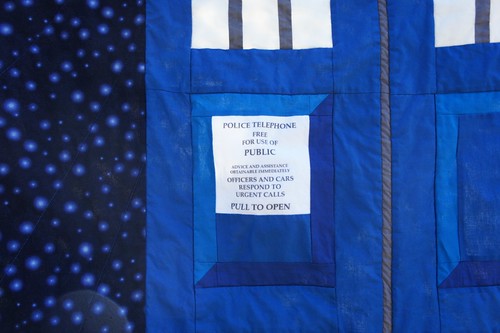
The signs were my biggest problem. I knew I could print the black on white text on with a printer using the freezer paper method. We actually went and bought a new printer during this process because the inkjet we had only had pigment (which is more permanent than dye-based) ink for black. The new printer does color with pigment inks, too. I’m excited to try that out soon.
The white text on black had me stumped for far too long. I finally realized I could use silk screen ink with a freezer paper stencil (yeah, I love freezer paper) and print my own sign. I love how it came out.
I was also asked to embroider a little message on the back, and this is what I came up with. I actually did the “I” and the “YOU” on my machine, and hand stitched the red hearts.

You can also see that the spoonflower fabric wasn’t quite wide enough, so I added a strip of the background fabric to finish it out.
I actually ran out of the background fabric in the middle of this project. I bought 2 yards originally and thought that woud be about 1/2 yard too much, but boy was I wrong! And not because I wasted any of it either. I had to send Chris back to the LQS during his lunch one day to get some more. (Yes, he’s definitely a keeper!)
The quilting doesn’t show up well in these pictures at. all. But I quilted in the ditch around the Tardis, and then in radiating lines from the “light” at the top over the rest of the quilt. It’s not a ton of quilting, so the whole thing is still rather soft and snuggly.

Even though I was worried that I wouldn’t have time to get this quilt done by Halloween, I actually finished and bound it (in a solid Kona blue) a few days early. It was really quite a simple quilt to put together once I solved the issues with the text fabrics. Of course, I could have had those printed at Spoonflower, but they take FOREVER and if the sign was the wrong size it would be a major disaster.
I’m surprised that I seem to have come to a point where a single quilt doesn’t take me months (or years) to complete! OTOH, I have a few quilts that I’ve been struggling with (or rather, designing on the fly, thus taking more thought than planning the dumb thing out in advance) for quite some time. But I’ll show you those in a future post…
On that note, I started a new geek job, so I’m kind of stretched for time these days. I’ll try to keep the blog updated, but don’t worry, I haven’t disappeared off the face of the Earth… yet.
Oct
18
Sewing Summit 2012
Filed Under Quilting, Remembering, Sewing | 6 Comments
Warning: Longest post ever is ahead.
Last weekend was the 2nd annual (it is going to be annual, isn’t it?) Sewing Summit. I’ve had the privilege to attend both years now, though, getting in was a lot easier last year before everyone knew about it and the tickets were so coveted. Heh!
As far as I can tell, most everyone had a great time, but everyone returned home flat out exhausted. I know I did. I didn’t sleep well at the hotel for some reason. I woke up over and over again all three nights. I think I should have just stayed in the sewing rooms until late every night rather than toss and turn in a strange bed. But there I go off on a tangent again…
We should start at the very beginning (a very good place to start*). Well, perhaps not the very beginning, that would involve boring you to death with details of registration and agonizing over which of the classes (out of so many awesome offerings) to try to attend. Rather I will start with the flight out. It was rather an uneventful flight (which is definitely a good thing!), until we were somewhere over Utah (I think). The clouds had finally cleared from below the aircraft, and the amazing landscape below was revealed. I’m sure I looked insane taking photos out the window of the plane with my iPad, but the views were just breathtaking.

One thing that I didn’t get a photo of because the “turn off all portable electronics” sign (have you noticed these replacing the no smoking signs in planes lately?) had lit up, was this giant hole in the earth. It was ah.maze.ing. I’ve since figured out that it is the Bingham Canyon Mine and is one of the largest man made holes in the Earth. I also spotted a big spire on the banks of the great salt lake (I think) but I don’t know what it was, so if anyone could tell me… And lastly, just before we were to land the lake itself came into view. I have to say, I don’t think I realized it was quite that big. Views like these make me realize just how tiny we are. It’s mind boggling.

After meeting Veronica to share a ride over to the Little America hotel, and an uneventful check in, I headed up to my room to drop my stuff off and went down to the hotel’s coffee shop for a sandwich I’d been waiting for since the last Sewing Summit. Alas, it wasn’t quite as good as I remembered it. Isn’t that how it always works out?

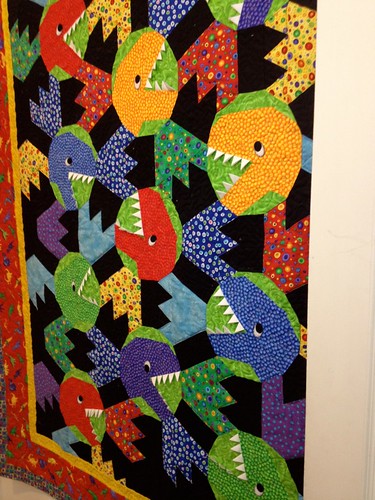
Then I met up with a friend from Austin and her mom for some shopping. She and I live in the same city, used to work together about 9 years ago, and haven’t seen each other in almost that long. It’s ridiculous that we had to fly to another state just to get together. But we had a great time hitting a yarn store with a cute Yorkie puppy, and two awesome quilt shops. I picked up some of the Sarah Jane Children at Play On Parade yardage. On sale. Score! And we saw this adorable monster quilt at Quilt, etc. The prairie points for teeth is just killing me!
Once I returned to the hotel it was time to get ready for the opening reception. And here’s where I have a confession… I’m an introvert. Really. I hate crowds. I hate mingling. I hate approaching people I don’t know. I am awful with names. And I hate making small talk. But I went, and I got my glass of red wine and I sat in a corner and talked to random people that came and sat at my table. It was quite pleasant actually. Until it wasn’t anymore, and the noise got to me. Then I left to go back to my room to get ready for dinner.
Back in my room I was clearing my pockets to repack my bag and discovered that my driver’s licence was not in my pocket. Oh. Shit. I hightailed it back down to the reception and started looking for it. I was practically crawling on the floor underneath tables trying to find it. I finally found Erin (oh wonderful Erin who busted her butt the whole weekend making everything go so smoothly!) and was going to have her make an announcement, but guess what? Awesome as she is, she already had it on her! Phew. I thought I was going to have to have Chris FedEx my passport to me so I could get home!
I had organized (ha! it was rather more chaotic) a group of ladies to go to Red Rock Brewery for dinner. It was within walking distance from the hotel and was a great time to chat with some new friends (in small groups — yay!). When the ten of us arrived we asked for a table, but then were informed of another large group. Were we part of that group? We asked if they identified themselves… The hostess says “Well, they have hand sewn name badges… ” Um, yeah, that’s our group!
So we sat, had way too much food and giant beers and all exchanged Moo and business cards. Then we walked back to the hotel for various swaps and open sewing. I didn’t last long since I’d been up since 4 am Utah time. By 10 I was done and headed to bed.
I think I’ve discovered that mornings are among my favorite times at Sewing Summit. Heading down to the lobby early to grab a giant cup of (actually better than decent) coffee and just hanging out with all the other sleep deprived sewists is just so pleasant. Last year I spent a lot of morning time with Faith and her sister, but this year when I headed down I didn’t immediately see anyone with a handmade bag or stitching or blogging or whatever it is that makes a sewing summit attendee so obviously part of the group. So I grabbed my coffee, had a seat and started checking instagram. And there, posted 15 seconds earlier was a picture of Jessica’s feet. So against my very nature I went over to say hi. And I’m so glad I did. We had some great chats, and also some great “just sitting there in silence” moments, too. After that, other people found us quite quickly and before I knew it a whole group of people had come to sit and have a light breakfast.
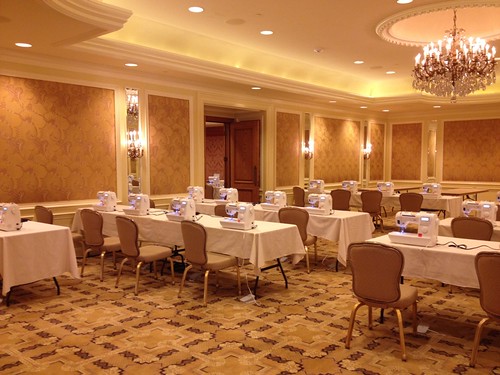
When 9 am rolled around, it was time for classes. I have to admit I was pretty excited about most of my classes, and most did not disappoint! There were a couple where I felt guilty for taking a spot since the material covered was really things I already have plenty of experience with. Interestingly, this year my selections had a lot more to do with sewing clothing than quilts.
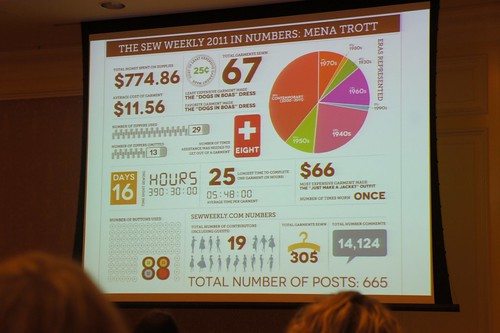
Mena’s Handmade Wardrobe class was a riot! She told some great stories of fabric acquisition and kept us generally entertained with her quips and anecdotes all while inspiring us to make our own clothing. Her blog stats slide was pretty funny as well.
The rest of the day was filled with more classes. Zippers with Sara (who had the most awesome dress!), English Paper Piecing (which was funny because I insisted on doing everything the exact opposite from the way the instructor, Katy, was telling us — yeah I’m such a rebel), and Children’s Pattern Making with Carrie. That last class was one of my favorites! I had such an ah ha! in the middle of it. I’ve tried my hand a few times at making clothing patterns, and I’ve been pretty successful so far, but now I have a real understanding of how and why pieces are shaped the way they are. I can’t wait to get drafting again.
After classes, I participated in the zippered pouch swap, picked up my i-spy charms from that swap and received my swapped fat quarters. A nice haul for about 30 minutes of time. Then I went shopping down at Pine Needles Quilt Shop in Gardner Village with my Austin friends. What a great time! There was a bit of a festival going on. Lots of people were dressed up as witches, and kids were running around having a great time despite the fact that it was 47 degrees and raining. There were also sales going on in every store. Seriously, I left Pine needles with 4 fat quarters and 2 yards of other fabric for less than 19 bucks! After all that commotion the three of us had dinner at a quiet local Italian place that I forget the name of. It was a perfect end to a long day.
Saturday morning I was up early again and found my friends in the lobby rather quickly. After lots of chatting and even more coffee it was time for another day of classes. This year we had two full days of classes and I think that was a great decision.
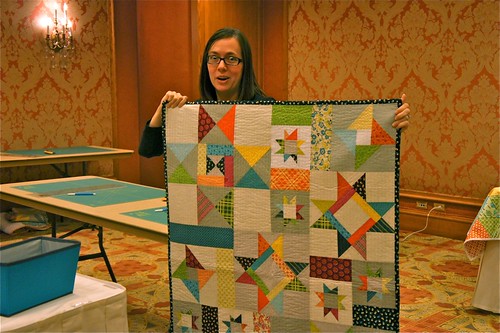
First up for the day was a class I’d been looking forward to since I heard it would be offered. Shapes and Angles with Kati and Faith was all about some more “advanced” quilt piecing techniques. I say “advanced” because after the instruction and during the practice time it was like “Duh! why didn’t I think of that!”. Their class was one of the most organized classes as well. It was one of the few where we made it through all of the material during the (way too) short time limit. (Sorry for the goofy expression, Faith, but trust me, this was the best one!)
The rest of the day was consumed learning about Finishing Details with Anna, Blogging tips with Tauni (also completely hilarious), and finally Make and Take Knit Top with Sunni. Sunni’s class was great because it was very individualized. It was basically a start sewing and ask questions as you go class. And I finally got someone who knows what they’re doing to measure me, since I can’t seem to measure myself accurately. I was also sitting next to the amazing Katie (yeah, there were lots of Kat[y-i-ie]s!) who just was all around very nice and very knowledgeable about sewing and altering clothing. I finished up the knit shirt in open sew later that evening, but that’s for another post.
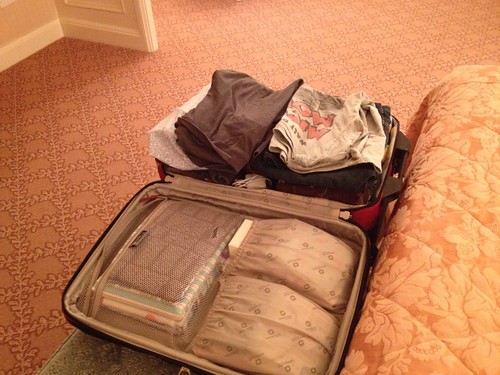
The closing dinner was up next, and the air was starting to have a bit of a sad-its-over-but-I’m-tired-and-want-to-get-home-to-my-kids/husband/cat air to it. After dinner I actually went to the sewing room (apparently the wrong one as the fun stuff was going on next door! Yeah, you guys know what you were up to!) and worked on a few things. But all too soon it was time to go upstairs and pack for my way too early flight the next day.
Back in the room I crammed all my clothes and this:
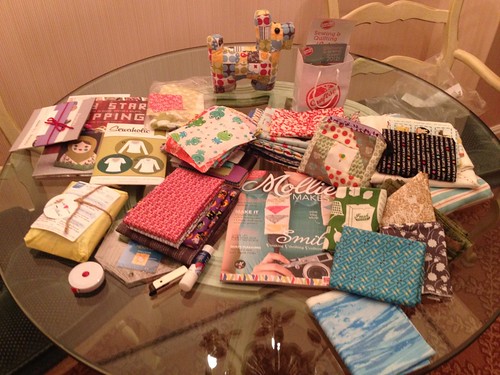
into this:
And the next morning, I was on my way home, but not without one last amazing sight. The sun coming up over the mountains:

I’m already looking forward to next year.
* a very good place to start according to Julie Andrews in the Sound of Music (yes, I am a nerd)
Oct
4
Open Wide!
Filed Under Quilting, Sewing | 2 Comments
Have you seen the tutorial for these great open wide pouches on Anna’s blog, Noodlehead?
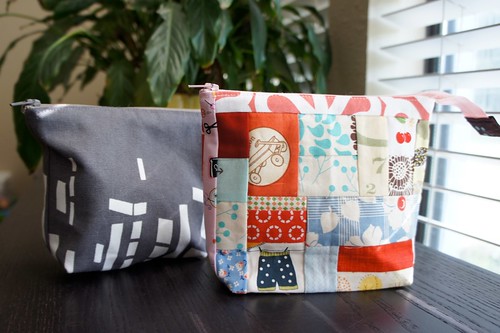
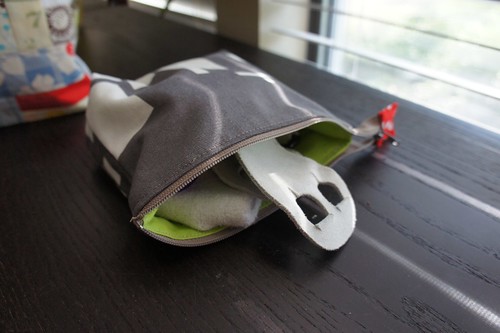
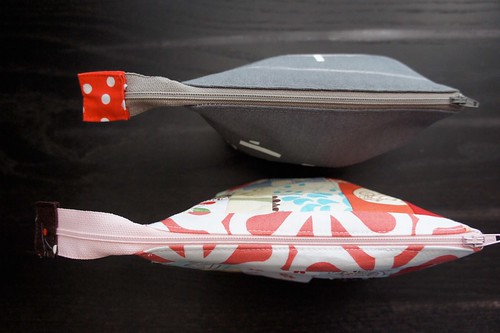
Last year for Sewing Summit I had cut the fabric I used here for the grey pouch, for another zippered pouch to match my improve tote. But I never made the pouch. So when I came across it in my sewing cabinet recently, I decided to give the open wide pouch tutorial a try. It’s such a quick project, but I will admit I did get hung up a little trying to keep the end of the zipper out of the way while sewing. It’s not quite as easy as it looks, but with a little seam ripping and trying again it is definitely achievable.
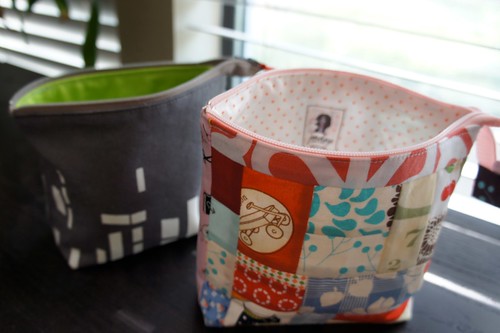
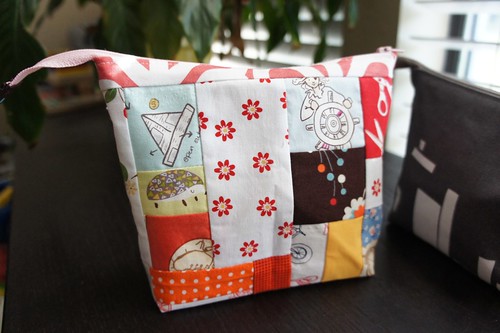
I’m not sure what has gotten into me, but I’ve been taking some of my smaller scraps and just sewing them up into big old patchwork pieces, which I then decided would be great as a pouch for the pouch swap at this year’s Sewing Summit (next week! ahhh!). I love how it came out. So much so that I almost made a different pouch for the swap. Instead, I sewed up more scraps into patchwork for an iPad case. Yeah, we’ll see if I ever get there.
I gave the grey bag to Alexis, and she is using it for her grip bag for gymnastics. It’s the perfect size for that and so easy for her to grab fast. (And trust me, she really needs the help being speedy… hehe.)
So tell me, are you going to Sewing Summit? Did you make a pouch for the swap? And even if you aren’t or you didn’t, will you try out the open wide pouch tutorial? Or what is your favorite pouch? (And on that note, I’ll quit blabbering…)
Sep
30
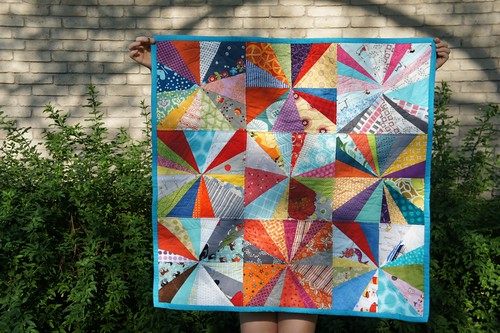
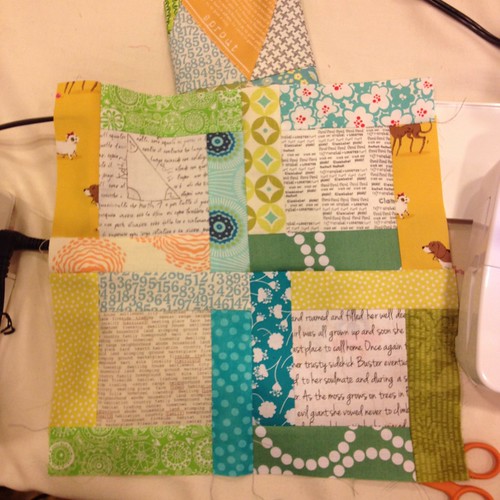
August was my month to be the quilter for our do. Good Stitches circle, Dream. I chose to have everyone make this (what I thought would be) simple starburst block by Ashley at Film in the Fridge. Looks easy right?
As it turns out, it’s really a lot more of a pain to get those points to line up than I ever imagined. I ended up making two of these blocks. Our group is in a bit of flux right now due to new babies and moving members and other exciting stuff, so we were a little short. I was going to make another 3 to make the whole quilt 3×4 blocks, but just couldn’t bring myself to do it. Those blocks are a pain! I apologize to all the lovely ladies of the dream circle for picking it.
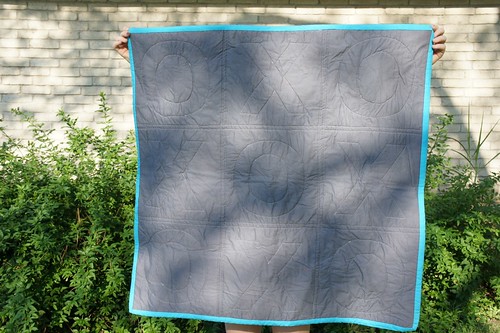
As it turns out though, the 3×3 layout inspired the quilting. After I’d quilted along the block seams I realized I had the perfect tic tac toe board, and so I quickly cut out an X and an O template and laid them out for quilting.

The binding I chose was a plain teal blue. Originally, I’d asked everyone to include a bit of gray in each brightly colored starburst as a way to tie them all together, but as it luck would have it, the aquas and teals really stand out more.
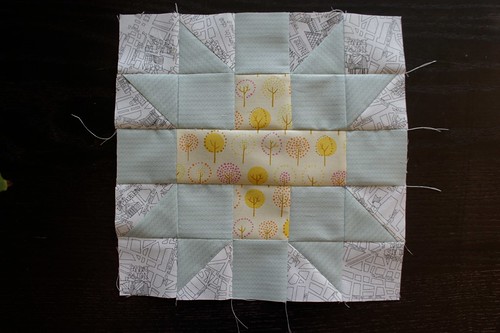
And here’s my block for September. I’m afraid it doesn’t look as bright and cheery as it did when I first pulled the fabrics. Really, quite muted.
Now, I just need to find the time to package these two goodies up and send them off.