


Dec
6
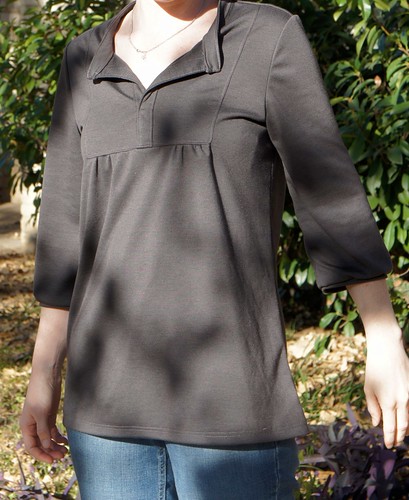
Best Tova Top Yet — In Knit!
Filed Under Sewing, Wearing | 3 Comments
I’ve been spending a lot of time working on clothing lately. A couple of tops for me (a Wiksten Tova and a Renfrew Tee), pajamas for the boy, and two new pajama pants for the girl. I’ve also got a leotard and bathrobe for Alexis on the blocks, and lots of fabric for more shirts for myself. If only I still had the motivation to get through that stack!
But today I’m going to tell you about my favorite piece so far. I’ve made a couple of Tova tops before out of quilting cotton. One of them I really like (and actually wear) but both are bit tight in the shoulders and underarms. The one I like less is really really tight despite my letting it out by nearly 3/8 inch all around. But I think if I went up a size, the rest of the shirt would just drown me. So even though I real like the pattern, I put it away for a while. Then I saw this top on pinterest. (You can see some of my other fashion — if you can call it that! — inspiration here.)
That version is actually the dress from the pattern, but I just loved the clean comfortable lines of it. It goes wonderfully with jeans. Perfect for work. So I went in search of a pretty gray wool and was determined to figure out how to broaden the back/shoulders of the pattern. Instead, I came home with a gray knit. The pattern is NOT made for knit fabrics. Which I knew, and I blatantly ignored my brain when it told me that I was nuts.
Of course that meant that I had lots of trouble sewing this shirt up. First of all, this is the first knit I’ve used that flat out wouldn’t work with a ball point needle. Skipped stitches galore! After some research (and rethreading and cursing and searching for a new machine and more rethreading and cursing), I found what I needed. On Black friday (of all days!) I headed to the local Hancock to buy ONE package of micro point needles. I had to wait in line for over 45 minutes for that little package of needles that cost me all of $2… but I was determined!
Once home, the difference was amazing. The clunk clunk clunking the machine had made before was minimized. (The serger still sounded like a train wreck, but at least it wasn’t skipping, too.) So what was going on that this magic thin needle helped? Turns out sometimes knits like this one don’t allow the needle to punch all the way through, which means the bobbin thread isn’t caught and thus skipped stitches. Have you ever had trouble pinning a certain fabric? Yeah, that’s the same issue. (Solved that one by getting these awesome pins from clover recommended by Sunni at A Fashionable Stitch.) BTW, I also read that you can solve this problem by putting a piece of waxed paper or tear out interfacing underneath the seam you are sewing to support the fabric so that it won’t stretch, but these were some long seams and I didn’t want to deal with tearing and moving paper all the way down.
I’d originally cut the pattern as the dress as my inspiration photo showed, but it was SO long, so I ended up cutting it off at the original hemline for the “top” version.
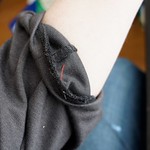
I also made a few changes to the pattern on the fly. First of all, I basted everything by hand before sewing it at the machine. (You can see my lovely red basting stitches in the sleeve photo above.) Also, you can imagine, top stitching through multiple layers of a thick (already persnickety) knit is no picnic, so after sewing the placket and collar, I decided to install the sleeve cuffs differently. I only folded the cuff, matched it to the edge of the sleeve and serged around it. I skipped all the quilt-binding style sewing and top stitching and I couldn’t be more pleased with the outcome.
On the hem, I simply serged around the bottom, and then planned on using a twin needle to sew it down. But, alas, the micro point twin needle did NOT alleviate the skipped stitches problem, and in the end (after several false starts and unpicking), I just sewed two lines of regular straight stitching. They aren’t perfect, but close enough. Lastly, the placket is much more floppy than it is when made from a woven, so I ended up needing to tack it closed about 2 inches up from the bottom.
This shirt is SO comfortable and isn’t tight through the shoulders at all. It’s my favorite shirt at the moment and I’ve been searching for another great knit so I can have another one!
Aug
15
Mermaids Again!
Filed Under Sewing, Wearing | 3 Comments
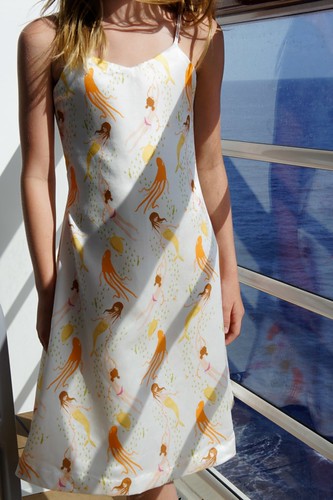
It’s a sickness, I know. When Heather Ross posted her mermaids for sale on Spoonflower* I had to have some even more so I ordered a yard. But in all my excitement I didn’t notice that the default fabric was the cotton silk blend, so when this gorgeous silky fabric arrived in my mailbox, I couldn’t help but feel a bit let down. What was I going to do with this type of material that was so suited to a formal dress?… especially since I only had a single yard. And then, I realized that Alexis needed a new formal dress for our cruise vacation that was coming up.
There was still the issue of limited fabric, and so I began searching, or rather scouring, the web for a cute pattern. Of course, there were none to be found. So what’s a seamstress to do? Make your own pattern of course! Using one of her favorite tank tops, and my Sew What? Skirts book, I drafted my very first dress pattern. I was a bit nervous about it, too, so when I finally had the pattern down, I did a trial run using a cheapo quilting cotton that I got for $1/yard. (I have to admit that I found the fabric Alexis picked out for this “muslin” to be hideous, but once it was done I really liked it. She does have an eye for fashion, that one.)

After I’d drafted the pattern and made the trial dress, I was still afraid to cut into the fabric. I agonized for days about how to lay the front and back on the fabric so as to maximize it’s usage. The layout where the pieces fit best also had the unfortunate side effect of making the direction of the print “upside down” on the back. There were other possibilities, but they involved piecing the back together and it would have required making the skirt less full. In the end, I decided to go with the upside down layout and figured that probably no one but me would even notice. Actually, I don’t even notice.
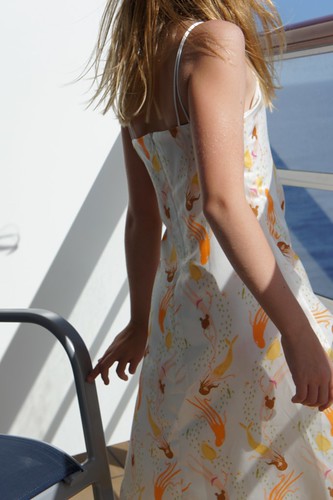
This was my first invisible zipper with a lining and I am amazed at how well it came out, but I think I need a different zipper foot. Mine is rather clunky, I’d like one of those ones that is super skinny. Actually, maybe I don’t, I get close enough to sewing through my fingers with the clunky one. Why tempt fate? ANYWAY…
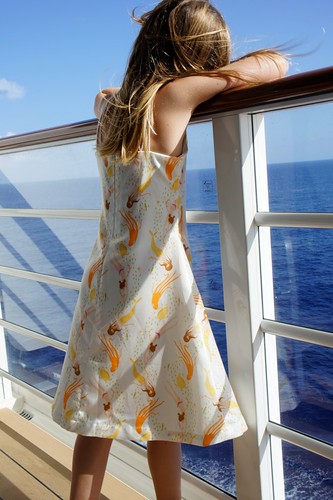
After a lot of debate with myself and Alexis (have you noticed I have a decision making problem?), I decided to go with a double strap over each shoulder. I’m so glad I did. I think it just adds the perfect amount of detail to the back of an otherwise very simple dress.
So there you have it. My very first go at actual pattern making for clothing. Don’t get me wrong, I’ve made dresses without a pattern before, but there was no shape to them (think jumper style over the shoulder A-line toddler dresses) and I didn’t really make the pattern. I have to say, this was such a success and so. much. fun. that I’ll definitely give it another go someday!
P.S. The cruise was fabulous!
* I should probably mention that these Swimming Sisters are also not of the same size as the Mendocino prints, OR of the previous Spoonflower offerings. There’s a picture of the different scales of this print on flickr. The scale of this fabric is in the middle.
Jun
1
(Not so) Fabulous Footwear Friday
Filed Under Wearing | 3 Comments

Yesterday I had a small bone fragment removed from my right foot. Yes, that’s right, my sewing foot!
This boot seems like such overkill for such a small surgery. Really, the only sore thing (well that I know of so far, I’m pretty drugged up still) is the incision on the back of my ankle that feels like a new shoe blister. Here’s hoping it’s better soon… I have sewing that must get done!
Dec
27
Handmade Holiday – AMH Scarf
Filed Under Giving, Sewing, Wearing | Leave a Comment
When I saw this tutorial by the infamous JeniB, I knew I had to make one of these scarves. At the time though, I didn’t realize I’d be doing it as a gift.

But when Chris and I drew a blank on what to get his mom — she has everything! — this scarf popped back up to the front of my mind. I had an entire set of Little Folks fat quarters from Anna Maria Horner that I’ve been hoarding for a quilt for myself, but I decided to bust into it and chose two neutral shades of the same forest hills print.

There just wasn’t anyway to substitute anything but an AMH voile for such a luxurious silky scarf. It’s the perfect juxtaposition to the snuggly flannel. And I love the way the pom poms add just a tiny playful touch.

Boy was Sean mad when I confiscated his new lovey Grandma’s new scarf. I hope she loves it as much as he did.
Oct
24
Plenty of Pirate PJ Pants
Filed Under Sewing, Wearing | 4 Comments
When I first saw Sue Zipkin’s Gone Haunting fabric in green I knew I had to have a pair of pajama pants made from it. Then Alexis saw it, too, and wanted a pair. But she preferred the black and white version. Then Chris pouted because he wanted some new comfy pants. So, heck, while I was at it I whipped up a pair for the baby in orange. You don’t want to know how much I spent on fabric for pajamas.

They’re all made from different patterns or lack thereof — ahem, mine… I tried to use a pattern, but skin tight green cotton pants with skull & crossbones on them are rather, well…. deadly. You can’t really see in these pictures, but my pants are so hacked up. I had to add a strip of fabric down the outsides of both legs. I also had to figure out what the heck was wrong that was making the front waistband ride up a la Urkel, but the back side droop like a plumber’s pants. Obviously I had a near miss, but they did finally work out for me.

Making the pants themselves wasn’t such a chore (I actually had mine done in time for Sewing Summit). But getting the pictures taken took a good two weeks. Everyone enjoys their pants and because of that it was impossible to have them all clean at the same time. Actually, in this picture, Sean’s pants are rather covered in apple butter. But what are you gonna do? Toddlers. Humph.