


May
9
Sewing/Baby Room
Filed Under Quilting, Sewing, Storing | 2 Comments
When I found out I was pregnant in 2009 (WTF? 2009?) I knew my sewing room was to be short lived. I struggled with where I would move all my junk until I realized that Alexis never spent any time in her room until she was nearly 3. So, I thought it was a great idea to combine the baby’s room with my sewing room. Until he went mobile what could happen?

Well, nothing happened, not even any sewing. I sort of forgot that the only time I would have to sew is when he was sleeping, and he would be sleeping in my sewing room. Um, duh. I blame pregnancy brain.
But before this great revelation, I spent a lot of time looking to see if anyone else had had this (stupid) idea. I couldn’t find anyone who had. In fact, at the time, pictures of workspaces in general seemed few and far between. My own blog post on the subject came up pretty high in the search order if that gives you any idea of the rarity. I’m happy to report that since then many many many bloggers have shared their workspaces with us. Which is great because I love seeing where people do their thing. I particularly love Anna Maria Horner’s new space. It’s given Chris and I some inspiration for our loft space(s).


Anyway, back to 2009… I was searching and searching and not finding squat! So I vowed I would take pictures and post the finished room. Yeah, ok, so I was slow about it. But it took most of my pregnancy to even pare my stuff down enough to get the crib in the room. So here are the pictures… finally. I won’t bore you with commentary on each one, but thought I might point out the closet share, and the storage in this great desk. I love having my thread on the keyboard tray, so easy to get to!

The drawers hold lots of stuff too! And my serger fits right in the computer tower cabinet like it was meant to go. Alas, I didn’t get a picture of that.


And here’s the side no one is really interested in… the baby’s stuff. ;) He desperately needs some stuff on the walls. I know it’s bare, but I just didn’t have the energy to decorate like I did with Alexis. Still, his side of the room is functional at least. More than I can say for my (dusty) sewing machine.
I bought that big rocker on a whim after my 28 week labs at the doctor. That stupid glucose drink makes me soooo sick, and so they put me in the room where women get hooked up to the fetal monitors. That room had the BEST most comfy big old rocker recliners, that I seriously went out and bought one that weekend. I had every intention of sleeping in it for the rest of the pregnancy, but that didn’t happen either. I did sit in it lots, and I use it all the time now, of course. So money well spent.

So that’s it. Just in time for me to move it… so stay tuned for the migration of the sewing room.
PS – Don’t buy that baby monitor… it sucks.
Jun
13
Done
Filed Under Crafting, Quilting, Storing | 4 Comments
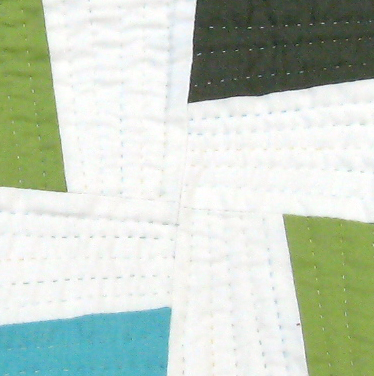
Finally! Now you can see why the quilting took so long. But it came out well, and I really like it. Especially the “scrappy” binding. I love multicolor bindings.


Apr
15
Stampede!
Filed Under Crafting, Storing | 2 Comments

Yep, there is all my spare time lately. A herd of Elefelts. For sale on Etsy. The two gray ones and the purple one already sold, but there is another purple one and 3 others in various stages on the way.
I also spent the weekend thinking about what other animals would work well in my shop. I’m about ready to dump all the other inventory and stick to the plush toys. So far, the black cats at Halloween did really really well, and the elephants have always done well. I’ve got a couple of chickens that have been listed forever that no one seems to want, and an orange kitty that is aching for a new home. And I’m going to retire the current fish pattern. I need to make a new one.
So I think I want to make a hippo, and spent the weekend drafting a pattern based on about 14 other hippo patterns and actually animal pictures I found on line. I think I’ve got one, but I’ve yet to actually try and sew it up. Alexis will be happy when I do, because she always gets the “prototype”.
But if any of you two readers have suggestions on cute, faceless stuffed animals, let me know. I suck at ideas.
Feb
28
 The weekend’s spoils.
I know when I started liking pink and pale green/turquoise together. When I was about 12, my gymnastics team got new uniforms. Previously we’d been wearing all lime green leotards with two diagonal stripes. One gold, one white. Unfortunately, we didn’t have much say in the design of the new uniforms, and they ended up being a dark green, a minty blue green and pink. I was sure they would be hideous, and they were, but most leotards (or leos as we called them) were pretty hideous in the mid-eighties. Still, the colors bring back good memories.
 But, I digress. I spent the weekend making this new needle roll because my first one was already falling apart. That, and it really wasn’t well designed anyway. I actually sat down this time and measured everything I wanted to fit, and planned and drew sketches to scale and finally cut and sewed this sucker from 2 1/2 fat quarters. And I’ll tell you, all that’s left of the blue floral is the selvage edge. I managed somehow to squeak out all the pieces I needed. Which is actually a miracle in itself as I really didn’t plan the cuts.
 I love that everything I need fits neatly inside, and I don’t have to go running down the stairs juggling a ball of yarn and knitting on the needles in order to fetch a crotchet hook to pick up a dropped stitch. I love the little zip pocket that holds those end caps and size tags perfectly. And all of my needle tips and DPNs fit, with room to grow. I also added a couple of strips near the top for hanging stitch holders and stitch markers (on binder rings – Target has the coolest colored ones!)
So, it’s not the really cool needle book idea I had planned out before. I’ve been working on that, but I might give it up as it is kinda cumbersome, even if it is really neat. But it works, and I like just looking at it all rolled up. Maggie Righetti, who taught me to knit through her book Knitting in Plain English, says to always take time to stop and admire your work, because it will give you satisfaction, and encourage a job well done. And there really is nothing more satisfying than seeing something completed.
Nov
5
Ribbon Storage Box Tutorial
Filed Under Crafting, Sewing, Storing | 34 Comments
) Ever since I made the first ribbon storage box to mimic this box from Oriental Trading, I’ve been thinking about how hard I looked for a good tutorial on the subject. I can’t promise that my tutorial will be “good”, but I’ll show you what I did.
Ever since I made the first ribbon storage box to mimic this box from Oriental Trading, I’ve been thinking about how hard I looked for a good tutorial on the subject. I can’t promise that my tutorial will be “good”, but I’ll show you what I did.

The first big problem is to find a good sturdy box that will accomodate a good number of ribbon spools I ended
up buying two of these (plus a smaller version of the same box) from IKEA. The great thing about them is that they are sold in packages of two, and they require assembly. Yep, you heard me right, I *LIKE* – in this case – that they weren’t complete on shipment. Here’s why:
 Because they are shipped flat, it’s much easier to mark the holes and insert the eyelets. But don’t let that discourage you. Any sturdy cardboard box would work.
The first step is, then to mark where you want the holes. I found that because I could put two rows of ribbon in the box, that I wanted lots of holes to poke it through. So I created this layout. 5 large eyelets on the bottom row, and 8 smaller ones on the top. I just drew two horizontal lines where I wanted each row to be and then evenly spaced each hole. (On this go round, I just opened the box I had completed already and traced the holes locations.)
 During my first attempt, I cut each hole by hand with an Exacto knife. That proved to be really hard as this is some seriously thick cardboard. So this time around, I asked my hubster to try using the drill. Ahhh… I saved the aching in my hands and ended up with much cleaner holes! Each hole he drilled was just a tiny bit bigger than the opening in the eyelet.
 Next, just insert the eyelets. The large and small follow a similar process, but follow the instructions on your eyelet kits.
 And voila! Your own neat ribbon storage! You can see that even with the extra holes I still needed to thread 2 ribbons through some. So far, that seems to be working ok. And it’s really easy to see what I have, and actually USE it because it’s easy to get to.
Now, does anyone know what to do with the little “bobbins of ribbon”? I have a million of those too!!!