


Nov
11
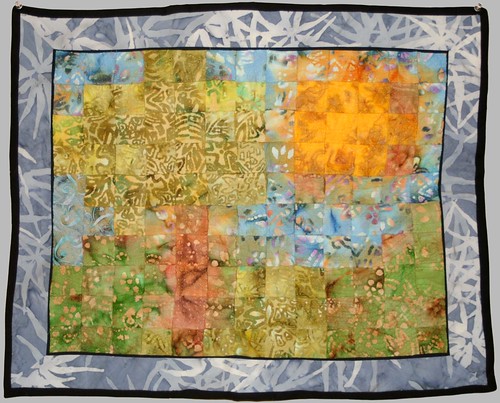
Batik Tree — Collaged Mini-quilt
Filed Under Quilting, Remembering, Sewing | 2 Comments
Here’s a little quilt that I don’t believe I’ve ever really explained. Oh sure, it showed up in my Celebrate Color intro post, but only in passing. It is also shown on my art page, but only with the tiniest blurb of detail. And so, in honor of amylouwho’s mini-quilt challenge, here is my collaged batik tree mini-quilt.
I made this little quilt way back in 2006. I only know that because I remember I was working on it when I went to Wichita to see a new doctor about my experience after a flu shot. I’m not really sure what inspired me to cut 2 inch squares out of a ga-gillion (yes that’s a number) different batik fabrics, and then arrange them to form a scene, but I remember sitting in front of the TV with a whole array of quilt squares in front of me while I prayed that the dog wouldn’t come up and step all over them.
I also don’t know why I decided to hand piece the whole thing, and with raw edges to boot. Each piece overlaps the adjacent pieces on two sides, so that every square has two raw edges. How edgy. <insert eye rolling and groans of agony here>
The blue border didn’t look quite right to me, and so I inserted (yet more raw edged) strips of black peeking out between the border and the main scene. It’s the only time I’ve ever done that. I wonder why, because I absolutely loved how it came out.
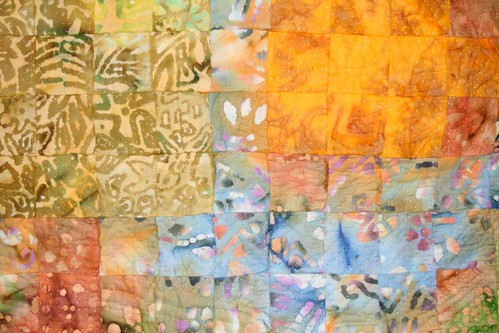
Not only was the whole thing hand-pieced, it was also hand-quilted. With less than a 1/4″ of space between stitches. Yeah. It took a while. But the result was completely worth it. I wish I had a better picture, but if you click on the one above, you can get a better (larger) view of the stitching. I was trying to capture the movement of the wind in the tree and grass, and the heat of the sun’s rays with my quilting.
So is it really a mini-quilt? I guess that would depend on your definition of “mini”. It’s smaller than all of the quilts I’ve made (barring the mug rugs) and is definitely too small to be any kind of covering, so I say it’s a mini. The whole quilt is only about 20″ x 25″. Alas, I can’t measure it as I gave it to my bestest friend for her 30th birthday.
What do you think? Does it fit the your definition of what a mini-quilt is?
Nov
8
do. Good Stitches — November
Filed Under Giving, Quilting, Sewing | Leave a Comment

This is my first month of do. Good Stitches {a Charity Bee}. I signed up to be a sewer, but Rachel talked me into being a quilter. Our bee group is Dream and is working on quilts for Project Night Night. Project Night Night donates loveys to homeless kids who need a bit of security in their life. As such, they ask for only smallish blankets and quilts (around 30″ x 40″) so I expect many many of our months will produce two baby size quilts.
Our quilter (and host) for the month is Lindsey of LRstitched and she chose to do a squares pattern like this one. She asked for one girl block and one boy block of about 12″ square. Of course, I immediately made the whole thing harder than it needed to be by making a new block pattern with multiple squares. And then, I didn’t have ANY of the color suggestions for either gender. So, darn. I had to go fabric shopping.
I also should note that they are vastly different in size because I figured out after I finished the first one, that the quarter inch marker on my sewing machine is rather about 1/8″ off. Nice huh? So I guess it’s good that Lindsey said they didn’t have to be exactly 12 inches.
I don’t know why, but I’m really nervous about these blocks. I’m not sure about my squares pattern or the colors. I think I stayed in the guidelines, but I don’t know. That’s just me. I worry about everything.
But on the upside, I’m really excited about being part of such a great cause and getting to work with all these awesome ladies. Looking forward to a good year of good stitching!
Nov
7
Ribs and Ruffles
Filed Under Giving, Knitting | Leave a Comment
This is my favorite girly-scarf pattern of all time. With my favorite chunky yarn of all time.
It’s the Misti Alpaca Hand painted Chunky yarn, and the “Ribs and Ruffles” free pattern from their website.

This yarn is so soft and squooshy (and cheaper than a cat!). It also comes in a whole bunch of different colorways. I can’t even tell you how many different skeins I’ve bought and knat into just this pattern for gifts. Maybe my friends are just too polite to tell me otherwise, but it has always been well received.
It’s also a super fast and super simple mindless knit. I can whip one of these up in an evening in front of the TV. It’s one of those great projects for when you feel the need to have something accomplished… now.

This was my last skein from an order a couple of years ago, and I think I am going to keep this one. But I’ve got to go order more yarn to have on hand in case I need an emergency gift… yeah, that’s the reason. yeah.
Nov
4
Friday Fail — The travel sewing kit
Filed Under Failing, Laughing, Quilting, Sewing | Leave a Comment
It’s been a while, but I have another Friday Fail for you. Ok, actually I had one for last week, but didn’t get pictures of it before I was so disgusted that I had to trash the whole thing — it was a mummy costume that I was going to do a tutorial for — maybe someday I’ll tell the story. But back to this weeks massive failure.

I know, I know, you’re looking at it and saying to yourself “What a cute little selvege project. I sure wish I had a little travel sewing kit that looked like that!”. Well, maybe you aren’t saying that to yourself. But you should be, because it is cute, I don’t disagree with that. But wait!

Unfortunately I forgot to take into account that the cover would not be stiff enough to keep the pockets inside pulled tight. And so, if you just tip it ever so slightly…..

Every freaking thing inside falls out! Argh. Fail!
Nov
2
Tree Skirt Knock-off
Filed Under Quilting, Ranting, Sewing | 4 Comments
Now that Halloween is over, it’s time to start the Christmas posts, right? I mean, the stores have been putting Christmas stuff out since the beginning of October. And last week I saw egg nog – egg nog!!! – on the shelves at the store. Didn’t we used to have to wait until the day after Thanksgiving for egg nog? I mean, sheesh, why not just sell it year round… and while you’re at it, why not sell girl scout cookies year round. Or peeps or whatever your holiday treat of choice is. Isn’t the whole idea of only marketing those things at certain times of the year that people will find it special and therefore buy more???
But I digress… again.
I present (ha ha get it pre-sent/present – ok, I know that was awful) to you my very first entry into the bloggers quilt festival.

Years ago I saw a tree skirt at Pottery Barn that I fell in love with. Of course, I didn’t want to pay $95 for a tree skirt. I mean, when I was a kid, I think we used an old sheet or something. No way, no how I was paying more than $15 for a tree-skirt. But oh, I had to have that perfect tree skirt, and this was in the height of my Pottery Barn knock off days. (You should see the wine cabinet I made Chris build.)

I’ve had friends bugging me for years to blog about this particular project. I did want to do a post on it on several occasions, but could never drag myself up to the attic to dig it out of its storage box before we put the tree up, and by the time the tree was up, the living room would be such a mess that there was no way I wanted photos of that on my blog.

So here it is. Well loved and not washed until last year… I was so afraid to wash it despite all the dog hair and dust because the only machine sewn seam on the whole thing is between the white background and the red border. Everything else is hand sewn. These days, I wouldn’t worry about hand sewn goods being put through the wash, but this was one of my first projects, and knowing now what I didn’t then, I was terrified that the whole thing would turn into a frayed mess in the washing machine.
But last year, after all the presents were opened and the piles of trash in the living room were picked up, I noticed a big gray smudge on the once white background. From the dog lying on the skirt. So I had to suck it up and wash the thing. I figured if it fell apart I’d just make another one. Though, I must admit that I did consider reenforcing it before the washing. But when I pulled the tree skirt from the dryer last year, I saw that now my beloved skirt was not only in one unfrayed (and clean!) piece, but it was also all freshly-washed quilty crinkly. I was elated. (I was also glad that the red border didn’t bleed all over the white background.)

The quilting on this bad boy shows me that by the time I made it, I had come a long way from the first quilt, and had some idea of what good hand-quilting was supposed to look like. Or at least what traditional quilt-show worthy hand-quilting looks like. I only say that because these days big visible stitches in hand-quilting seem to be the cool thing to do. You can also see that I didn’t “properly” bind this quilt either. I merely rolled the backing fabric to the front and sewed it down. I’ve done that on a few quilts too, because sometimes it’s just the only thing that will work. I’m sure that quilt-show judges would ding me for that, too. (Yes, Amanda, I’m talking to you… wink wink).

And just because… a gratuitous kid photo. Apparently she likes lying on the quilt as much as the dog.